APay Integration
Overview
Amazon Pay (APay) provides buyers (or customers) with a secure, trusted, and convenient way to sign in and pay for their purchases on 3P site by using their Amazon credentials. See browser support for information about the operating systems, browsers, and browser versions supported by Amazon Pay.
This guide provides an overview of the buyer experience and shows you how to integrate with the latest checkout technology from Amazon Pay.
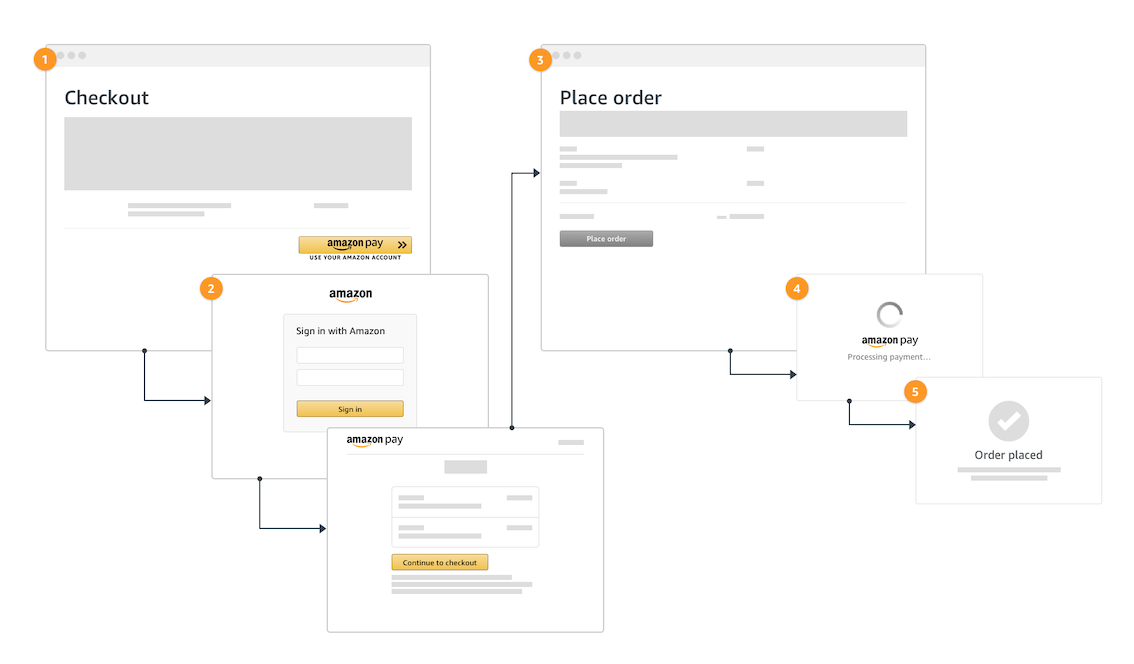
- The buyer clicks on the Amazon Pay button to start checkout.
- The buyer signs in, confirms their preferred payment instrument, and optionally selects a shipping address on the Amazon Pay-hosted page.
- The buyer is redirected back to your order review page for confirmation.
- The buyer completes checkout on the Amazon Pay-hosted page by responding to the multi-factor authentication (identity validation) challenge, if prompted, or by selecting another payment method if payment was declined.
- Amazon Pay redirects the buyer back to your confirmation page.
APay Integration - Steps
1. Get set up for integration
In this step, you will register for an Amazon Pay merchant account. After registration, you will create a Sandbox buyer account for testing and get your Public Key ID to access Amazon Pay APIs. At the end of this step, you will be ready to start integration.
Please refer : https://developer.amazon.com/docs/amazon-pay-paymentmethodonfile-signinandsetup/get-set-up-for-integration.html
2. Touchless Integration for Amazon Pay Sign In
In this step, you will configure the Amazon Pay Checkout Session object and then initiate the Amazon Pay sign in. At the end of this step, you will be able to redirect the buyer to an Amazon Pay hosted page where they can sign in using their Amazon login credentials. You can follow the steps provided here https://developer.amazon.com/docs/amazon-pay-paymentmethodonfile-signinandsetup/add-the-amazon-pay-button.html
Note: The only change for touchless flow is not to render the button as described in above doc.
So instead of using amazon.Pay.renderButton please use amazon.Pay.initCheckout.
Below is the code snippet that can be used as a reference:
<body>

  <script src="https://static-na.payments-amazon.com/checkout.js"></script>
  <script>
    function initAmazonPayCheckout() {
      amazon.Pay.initCheckout({
        merchantId: 'xxxxx',
        ledgerCurrency: 'USD',// Amazon Pay account ledger currency
        sandbox: true,// dev environment
        checkoutLanguage: 'en_US',// render language
        productType: 'SignInAndSetup',
        placement: 'Headless', // Placement is required as of now which isn't really needed for SignInAndSetup touchless integration
        createCheckoutSessionConfig: {
          payloadJSON: '{"storeId":"amzn1.application-oa2-client.xxxxx","signInScopes":[...],"webCheckoutDetails":[...]}',
          signature: 'xxxx',
          publicKeyId: 'xxxxxxxxxx'
        }
      });
    }
  </script>

</body>
3. Complete Setup and Retrieve customer details
Please refer: https://developer.amazon.com/docs/amazon-pay-paymentmethodonfile-signinandsetup/verify-and-complete-checkout.html
4. Complete Amazon Pay Wallet Integration for Checkout
Please visit - Manage Payments Using Saved Wallet (https://developer.amazon.com/docs/amazon-pay-paymentmethodonfile-signinandsetup/manage-payments-using-payment-method-on-file.html) to complete Steps 4 to 7.